- Article Index
- About Us
- Contact
- Language/Idioma
-

-

Archives - Dec 2012 to Feb 2013:
Photographing the Stars - Feb 2013 - Dave
 Being
a big lover of all things cosmic I've always had photographing the stars on my list of
things to do but like a lot of photographers it is getting the time to go out and pursue the things
that you actually love that is the hard part. On Friday passed, with the news of the
meteorites hitting Russia and the near-earth pass of the asteroid 2012 DA14 I made it my business to
go out with the camera.
Being
a big lover of all things cosmic I've always had photographing the stars on my list of
things to do but like a lot of photographers it is getting the time to go out and pursue the things
that you actually love that is the hard part. On Friday passed, with the news of the
meteorites hitting Russia and the near-earth pass of the asteroid 2012 DA14 I made it my business to
go out with the camera.
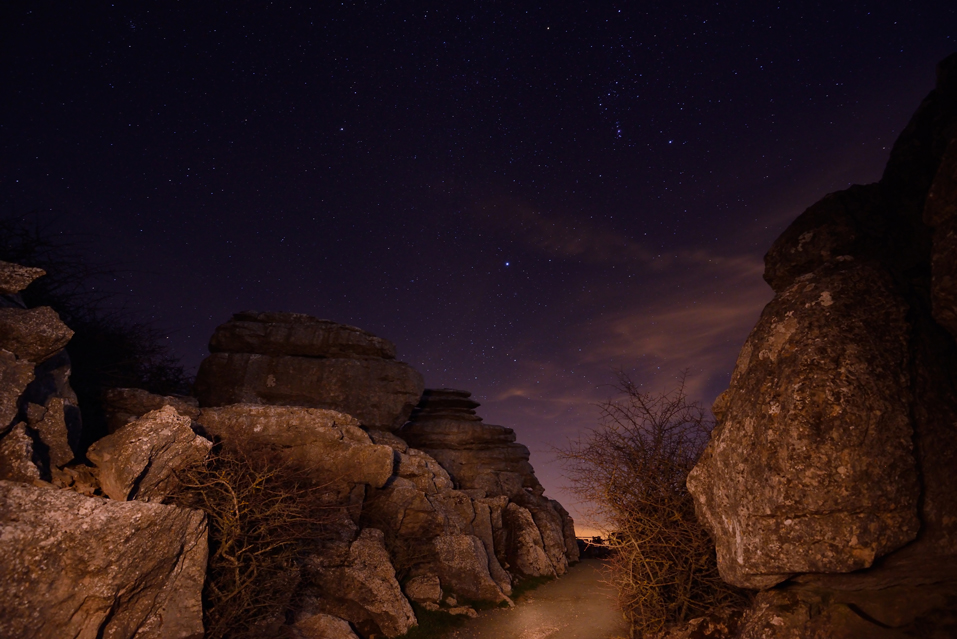
I had been planning this for a few weeks now. The destination was the Centro de Visitantes del Torcal de Antequera, an observatory located in Antequera Nature Reserve. It's only about 45 minutes from Malaga by car. As it happened, the observatory was buzzing with astronomers of all types looking for the 45 metre wide asteroid that was due to pass at around 21:00 GMT. The great thing about the observatory was its location. At over 1000m altitude and well away from the light polluted city of Malaga it ensures far better visibility. The only downside was the moon, it wasn't quite a half moon but it was sufficient enough to spoil star visibility.
Given this was my first attempt at taking astro-landscape photos I was not expecting too much. It was more to get some experience, check out the observatory, try out some techniques and maybe at the end, come away with some decent photos. I brought one lens only, my 16-35mm f/4. Other obligatory gear included tripod, remote shutter release, Maglite and my Litepanels MicroPro LED video light. The Maglite I used to find my way around but also to paint with light. I used the MicroPro with a half-tungsten gel for some light painting though this was harder to control the spill of light so I ended up using the video light for painting the foreground objects then focussing the beam on the Maglite to paint the further away stuff. I set the colour temperature on the camera to 4200 Kelvin. The intention here was to mix between the tungsten haze and daylight color of the stars. The ISO I set to 2000. I set the shutter release mode to Mirror Up. In terms of shutter speeds I left it around the 20 to 25 second mark. Even though I was using an ultra wide angle lens I've read that going above this will lead to star trails as opposed to pin-sharp stars. Looking at the finished images now I reckon I should have kept to the 20 seconds as some of the images have very slight trails. So next time I head out I will up the ISO to 4000 and drop the exposure time by a stop. Obviously the higher your focal length, the shorter your shutter speed must be to avoid star trails.
Focussing was a big problem. Most of the time I used the Maglite to light up something in the foreground so I could focus on it but this meant I had to have the foreground object in range of one of the 51 autofocus sensors on the D800. This messed about with composition as I didn't get enough of the sky as I would have wanted. I also tried the trick of putting a torch about 20 metres away (see photo below), focussing on it and then setting the focus mode on the lens to manual. This only worked half the time. If anyone reading has a surefire method of focussing then drop me a mail.
I've made the top left image available in full resolution so if you would like to download to take a closer look or even use it as a wallpaper on your PC or tablet then you can download it here. All I ask is that you respect copyright. You can check out a few more photos below:
If, like myself, you are starting out with this type of photography then really all you need is a decent DSLR preferably with high ISO noise tolerance and mirror up mode, a decent wide angle lens, a sturdy tripod, a shutter release trigger and that is about it. It is reasonably accessible in terms of equipment required. The big thing is time and obviously being able to get well outside light polluted areas. In terms of post processing the images, any free post processing editor will work. On this batch of images I used View NX2 on the Nikon RAW files and nothing more. View NX2 is free and is a top RAW editor for Nikon .NEF files. For Canon shooters, DPP is the free Canon RAW editor of choice. I suggest shooting in RAW as it will give you far more leeway in post processing your images in terms of white balance and exposure.
I plan to spend a lot more time on this particular type of photography over the coming years so if you have a similar interest and like some of the images above then bookmark this page or preferably like our Facebook page. I will be updating this blog as I go so hopefully as technique improves I can share some more nice images and information on how I took them.
Antonio Photoshoot - Jan 2013 - Dave/Sonia
 We
were down in Mijas again recently photographing male model Antonio in the beautiful surroundings of
the Museo de Taurino de Mijas, the bullfighting museum located up a little side street in Mijas pueblo.
Just a stone throw from the Plaza de Toros where we organised the photoshoot with Lynne quite recently
this little museum is full of bullfighting memorabilia dating back generations and is a must visit for
anyone in the area.
We
were down in Mijas again recently photographing male model Antonio in the beautiful surroundings of
the Museo de Taurino de Mijas, the bullfighting museum located up a little side street in Mijas pueblo.
Just a stone throw from the Plaza de Toros where we organised the photoshoot with Lynne quite recently
this little museum is full of bullfighting memorabilia dating back generations and is a must visit for
anyone in the area.
Antonio, having a long family history associated with bullfighting was keen to capture this theme as part of the shoot. So there was plenty of authentic bullfighting memorabilia, props of all shapes and sizes. The only thing we were missing on the day was the actual bull itself! In the end, with the limited time available, we had to narrow the number of styles down to three. The intention however was to put a modern twist on image of the classical Spanish Torero.
In terms of makeup, there was very little to do. Sonia use subtle brown tones with a touch of eye liner to accentuate Antonios eyes. She then defined his cheekbones with more light brown tones to suit Antonios skin coloring. Photographically, it was a mix of softbox and umbrella off camera lighting and on-camera bounce flash off a reflector in the museum. We also used a video light for some of the images. Outside we went for the bronzed Adonis look using a big gold reflector. We had to improvise in terms of a background as we never brought our own ones so a big brown curtain was used for some of the shots. Antonio had two original silk, heavily-embroidered bullfighting jackets called Trajes de Luces (Suit of lights) which we drooled over. In the end we didn't have the correct backgrounds with us to complement these works of art so we plan to catch up with Antonio again and arrange a more studio styled shoot to capture these and other rarities that he had.
For a more complete selection of the images from the shoot you can check out the gallery link here. The gallery is password protected so you will need to get the password from Antonio directly.
Equipment Used: Nikon D700, D800, SB-910 x 2, 85 f/1.4G, 70-200 f/2.8 VRII, PocketWizard Flex TT5 x 2 and Mini TT1, Lastolite EZYBOX, LitePanels MicroPro LED Videolight, Reflectors of various sorts and a 40 inch umbrella :-)
The Rule of Thirds. Another photographic rule? Or is it something more?
 This
is the first in a number of composition based articles centred on how you frame
your subject or compose your image before pressing the shutter. Before kicking off,
I would like to state that, on a personal level, I am not massively fond of being
restricted by rigid photographic rules. I believe they are there to be broken, but
this particular rule, the Rule of Thirds, is something I would adhere to a great deal
when shooting in landscape orientation. Like any rule, it is best if you understand
the concept and understand why and where it should be applied. You will then be in a
better position to determine when it shouldn’t be applied making your rule-breaking
photos more dynamic.
This
is the first in a number of composition based articles centred on how you frame
your subject or compose your image before pressing the shutter. Before kicking off,
I would like to state that, on a personal level, I am not massively fond of being
restricted by rigid photographic rules. I believe they are there to be broken, but
this particular rule, the Rule of Thirds, is something I would adhere to a great deal
when shooting in landscape orientation. Like any rule, it is best if you understand
the concept and understand why and where it should be applied. You will then be in a
better position to determine when it shouldn’t be applied making your rule-breaking
photos more dynamic.
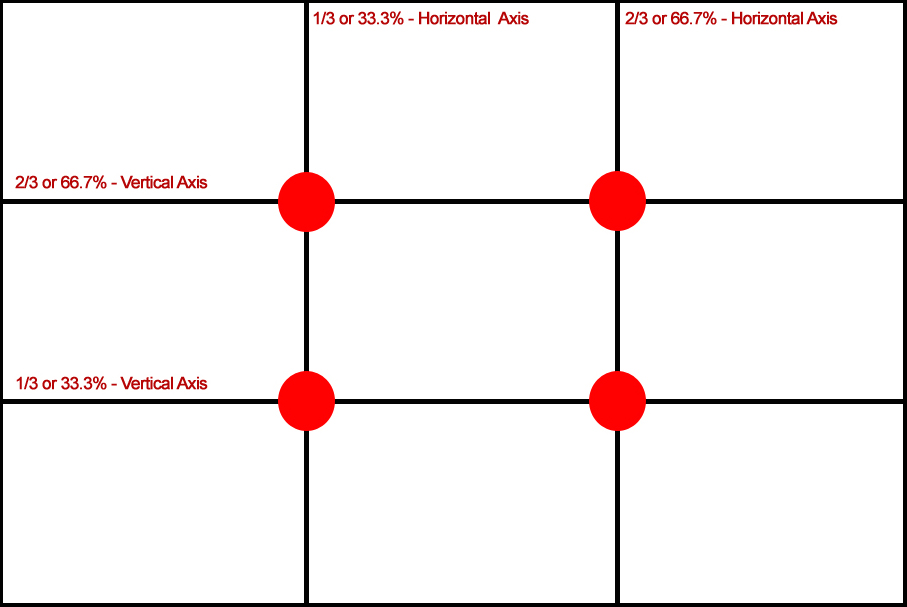
Most people when starting out taking pictures have an automatic impulse to centre their subject in the bull’s-eye position within the frame, in other words, dead centre, top and bottom. Although the centre focus point on a DSLR might be the best, it is unfortunately not the best place to position your subject if you want to add dimension, depth and a sense of direction to the image. According to photographic theory, if you break your frame down into 9 individual sections using a grid as shown in the photo to the right you will end up with 4 clear points commonly called power points on the grid where horizontal and vertical lines intersect. These horizontal and vertical . . . . . read more. . . .
Carmen & Julio: Portrait Session - Dave/Sonia
 Recently we had
arranged to drop in to the home of Carmen and Julio to take some photos of their beautiful
daughter Carmen-Victoria. At just over 7 months we were a little worried that she would lose
interest but we soon discovered with a little well-timed false sneezing the
giggles weren't long to follow. Little Carmen took the firing of the flashes in her stride
and did a fine job of sitting up straight for the hour or so that we were shooting. It may
be just a personal observation but there is something about Spanish genetics when it comes to kids
in general, they are just gorgeous. It's a rare occassion when you come across a Spanish baby that
isn't photogenic and Carmen Victoria is no exception to that rule.
Recently we had
arranged to drop in to the home of Carmen and Julio to take some photos of their beautiful
daughter Carmen-Victoria. At just over 7 months we were a little worried that she would lose
interest but we soon discovered with a little well-timed false sneezing the
giggles weren't long to follow. Little Carmen took the firing of the flashes in her stride
and did a fine job of sitting up straight for the hour or so that we were shooting. It may
be just a personal observation but there is something about Spanish genetics when it comes to kids
in general, they are just gorgeous. It's a rare occassion when you come across a Spanish baby that
isn't photogenic and Carmen Victoria is no exception to that rule.
Sonia was on make up duty for Mammy. Given Carmen had big beautiful brown eyes Sonia brought out the color and size by marking the structure of the eye with dark brown and once complete, she used brown, orange and pearl white on the eyelids. For the lips, since Carmen had great teeth the only thing that needed to be done was to exaggerate them using natural clear brown and orange gloss. Carmen was after a natural look so this fit the bill.
If you are based in Malaga and are looking for some photos of your little one(s), then get in touch. There will be no need to leave the comfort of your own home. We will come to you with our studio. All we need is a bit of space and about 60 to 90 minutes. If you choose, Sonia can do your make up for you which will be done specifically to suit your personal taste but also to elliminate shine in the finished photos. You will then have a set of photos that you will cherish for the rest of your life.
The photos above are just a small selection of those taken on the day. For a bigger selection of images you can check out their online gallery here though it is password protected so you will need to get the password from them directly. Most photos were taken with an 85mm f/1.4 lens though the family photos were taken with a 24-70 f/2.8. The camera used was a Nikon D800. If you are looking for big prints for your wall then we can do that too. Carmen and Julio have been good enough to allow us put the full resolution version of the above left image (with watermarks) on the site so if you would like to see the actual size and clarity of the 14MB image you can check it out here.
Mijas: Plaza de Toros - In Pictures - Dave
 Just before
the shoot we had with Lynne recently I had arranged to
take some wide angle shots of the Plaza de Toros itself as a way of thanks to the owners
for shutting down the Plaza while we were there. Nestled in the foothills of the
Andalucian mountains, Mijas is a jewel in the Andalucian crown and what makes it all the
more lovely is the fact that it has retained the Spanish whitewashed "pueblo" feel even
though it is a hive of activity and a serious tourist hotspot. If you walk up through the town itself
you will come to the Plaza de Toros. It is a small bullring, though has the honour of
being the oldest in Spain and although small, it is most certainly not lacking in character
as you can see in the photos.
Just before
the shoot we had with Lynne recently I had arranged to
take some wide angle shots of the Plaza de Toros itself as a way of thanks to the owners
for shutting down the Plaza while we were there. Nestled in the foothills of the
Andalucian mountains, Mijas is a jewel in the Andalucian crown and what makes it all the
more lovely is the fact that it has retained the Spanish whitewashed "pueblo" feel even
though it is a hive of activity and a serious tourist hotspot. If you walk up through the town itself
you will come to the Plaza de Toros. It is a small bullring, though has the honour of
being the oldest in Spain and although small, it is most certainly not lacking in character
as you can see in the photos.
I have added a couple of photos below but I'll add, they need to be seen big. For those interested I've created a gallery where you can see the original images in full 100% resolution. The gallery is open to all visitors and you can get to it here. For those visiting Málaga, this little town is certainly one of my own personal favourites and is a must visit if you are in the area. While you are there, why not visit the Plaza itself. If you drop in on a Sunday you can join in on the professionally tutored Flamenco classes! Or if you time it really well you can watch the matadors do their thing.
Most photos were taken with the Nikon 16-35mm f/4 lens. I stuck a circular polariser on the front of it to give me more colour saturation of the sky and the reds of the Plaza itself. The other images were taken using the 70-200mm f/2.8 VRII with ND8x filter to give me the shallow depth of field I was after.
Bokeh, boke, blur, haze, haziness, dizziness . . . what? . . . :
 Bokeh or Boke refers
to how pleasing the out of focus areas of an image look to a viewer. If the out of
focus area enhances the final image then the bokeh can be considered good. Bokeh does not mean “depth
of field” nor does it have any relationship with vignettes like a lot of people try and tell you. Bokeh
is something you can judge when a shallow depth of field is used in a photo but does not have any bearing
on the depth of field itself. Bokeh is a Japanese word and means “blur” or “haze” and is pronounced similar
to “bouquet” like a bouquet of flowers. You could consider sharpness and bokeh as lens qualities that
exist at the opposite end of the “lens” spectrum. As sharpness is a quality you would look for at the point
of focus of an image, bokeh is what you would look for in the areas out of focus.
Bokeh or Boke refers
to how pleasing the out of focus areas of an image look to a viewer. If the out of
focus area enhances the final image then the bokeh can be considered good. Bokeh does not mean “depth
of field” nor does it have any relationship with vignettes like a lot of people try and tell you. Bokeh
is something you can judge when a shallow depth of field is used in a photo but does not have any bearing
on the depth of field itself. Bokeh is a Japanese word and means “blur” or “haze” and is pronounced similar
to “bouquet” like a bouquet of flowers. You could consider sharpness and bokeh as lens qualities that
exist at the opposite end of the “lens” spectrum. As sharpness is a quality you would look for at the point
of focus of an image, bokeh is what you would look for in the areas out of focus.
Typically, on good fast professional lenses bokeh will be best. When I say fast lenses, I mean those with wide apertures, f/1.2, f/1.4, f/1.8, f/2, f/2.8 for example. The reason is twofold. Firstly, these high-end lenses, when used at their lowest aperture produce images with a very shallow depth of field. This means that your subject, when on a different focal plane to the rest of the image, will appear in focus while the rest will be out of focus. The further your . . . . . read more. . . .
Lynne Photoshoot - 02 Dec 2012 - Dave/Sonia
 We
were out and about in Mijas Pueblo recently photographing English model Lynne in the
fabulous Plaza de Toros. Located in the Andalucian foothills in Málaga province, what
better place to arrange a photoshoot with lovely Lynne all dressed "estilo Flamenco"
than the oldest Plaza de Toros in Spain. Originally from Brighton in the UK, Lynne,
husband Dan and their 6 daughters have been living on the Costa del Sol since 2006.
Lovers of sun, beaches, good food, fine wine and great humored people there is no
better place in Europe. Viva Málaga! Viva!!
We
were out and about in Mijas Pueblo recently photographing English model Lynne in the
fabulous Plaza de Toros. Located in the Andalucian foothills in Málaga province, what
better place to arrange a photoshoot with lovely Lynne all dressed "estilo Flamenco"
than the oldest Plaza de Toros in Spain. Originally from Brighton in the UK, Lynne,
husband Dan and their 6 daughters have been living on the Costa del Sol since 2006.
Lovers of sun, beaches, good food, fine wine and great humored people there is no
better place in Europe. Viva Málaga! Viva!!
Once again Sonia was on make up duty. With Lynne's great dark West Indian genetics there was very little to do in terms of make up correction. Sonia went for the dark and bold to suit the whole Flamenco theme. Sonia chose dark smoked and intense eyes and high contrast red lips as is typical of the flamenco style. But all was chosen to suit skin tone.
From a photographic perspective things were a little more tricky. By the time we started shooting it was midday and the sun was rising high in the cloudless sky. Being a big lover of off-camera flash I decided to mix it up a bit and use a gold reflector to start to bring out Lynne's great dark skin and then move on to flash balanced photos as the sun rose higher. It was a bit of a balancing act in terms of positioning Lynne to avoid harsh facial sun shadows but we managed to do it and get the most out of the fabulous location we were shooting in. Eventually we had to ditch the reflector as Sonia was having a hard time preventing it from flying off into the Andalucian mountains. Reflector dropped, I turned to my trusty Lastolite Ezybox and SB-910. Most of the images were shot using the 70-200mm f/2.8 VRII with ND8x filter to give me the shallow depth of field I was after. I've added a number of images from the shoot below. For a more complete selection of the images from the shoot, head over to Lynne's December gallery. For someone who has never been in a Flamenco dress before we reckon she has done a sterling job. You better watch out, you might be mistaken for a proper "Gitana" if go out in that dress!
Equipment Used: Nikon D800, SB-910, 85 f/1.4G, 70-200 f/2.8 VRII, PocketWizard Flex TT5 and Mini TT1, Lastolite EZYBOX and reflector.
Thanks: A big thanks to Lynne, Dan and their daughters for putting up with the cold and wind. It was genuinely cold out there. A huge thanks to Antonio for organising and facilitating the shoot for us. After so many weekends of bad weather and cancellations it was great to finally get up and shoot in such a great location. Big thanks also to Maria del Carmen for making things so easy for us on the day. For those that have never been in the Plaza de Toros in Mijas Pueblo, or in Mijas Pueblo for that matter you should definitely put it on your "places-to-visit" list when in Málaga. I managed to get some nice photos of the Plaza while Sonia was applying the make up. I'll add these as part of another article.
The Wedding of Caroline and Fergal Harte - Carton House Oct 2012
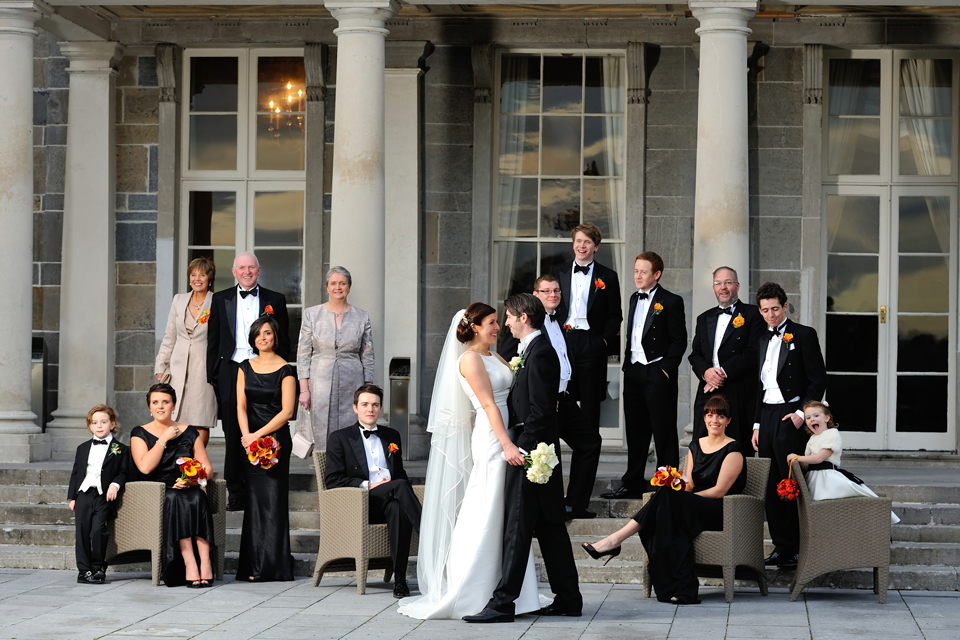 We recently had the
honour of photographing the wedding of Caroline and Fergal in the fabulous Carton
House, Co. Kildare, Ireland. All day the sun shone down on them both making the day even more
memorable. With the brollies left in the boot, the hotel surroundings and those rustic
Autumn colors it made for some very pretty and picturesque backdrops.
We recently had the
honour of photographing the wedding of Caroline and Fergal in the fabulous Carton
House, Co. Kildare, Ireland. All day the sun shone down on them both making the day even more
memorable. With the brollies left in the boot, the hotel surroundings and those rustic
Autumn colors it made for some very pretty and picturesque backdrops.
You can view a bigger selection of images in their online gallery here though it is password protected so you will need to get the password from them directly. I have enabled comments on the gallery so if you were a guest at the wedding then feel free to leave a comment or two.
The guest gallery is still open so for those that were present on the day, if you have photos or videos that you have not uploaded yet then upload them using the gallery link here. There are a number of different upload options so there is certain to be one to suit.
If you or a friend have a wedding coming up and are looking for a complete set of fresh, modern and colorful images then get in touch through our contact page and let us know the details of your event.
Testimonials
 This was the first time I ever had a photo shoot and I was very impressed with your professionalism and how relaxed I was made to feel. My pictures are amazing. Thanks Dave and Sonia! Emma W
Even though our 1 year old decided to be moody and un-cooperative, the end results were outstanding. By far the best photography our family has ever had. Marisa
Latest News
Contact
![]() +34-677-695-450
+34-677-695-450
![]() +353-86-8370321
+353-86-8370321
Email: info@imagen-estilo.com
![]()
![]()
![]()
![]()
![]()
Imagen-Estilo ©
All Rights Reserved
Design by: David Cummins
Going Shopping? Check out our recommended "Resource Guide"