- Article Index
- About Us
- Contact
- Language/Idioma
-

-

Photographing the Sun or a Solar Eclipse - Explained:
Is it actually that difficult to take photos of our nearest star...?
 OK, first up, this article is solely
for those of you who want to photograph the sun with a DSLR. Telescopes and solar filters will not be
discussed here. So if you are one of those individuals and have a camera and a reasonable telephoto
lens and are not quite sure how to safely take photos of the sun then read on, this article will cover
everything you need to know!
OK, first up, this article is solely
for those of you who want to photograph the sun with a DSLR. Telescopes and solar filters will not be
discussed here. So if you are one of those individuals and have a camera and a reasonable telephoto
lens and are not quite sure how to safely take photos of the sun then read on, this article will cover
everything you need to know!
The sun, even though it is so readily available as a subject to photograph, it is a very tricky subject to do correctly. Very simply, if you are not careful and do not follow some basic precautions you could seriously damage your eyesight or even worse go blind altogether. Living in Málaga in Spain, we have the sun almost all year round. Sunglasses are essential over 300 days of the year but do you think you are safe looking at the sun with a pair of Ray Bans? Definitely not and I do not recommend you try it. The sun, without exception, is the brightest subject you can possibly photograph and its relative brightness goes far beyond the capabilities of all DSLR's on the market. If you think you can simply set your camera to f/22 and 1/8000s shutter speed and point your camera at the sun then you are very mistaken. You will cook your sensor and if you use the viewfinder to frame and focus then you will cook your retinas also.
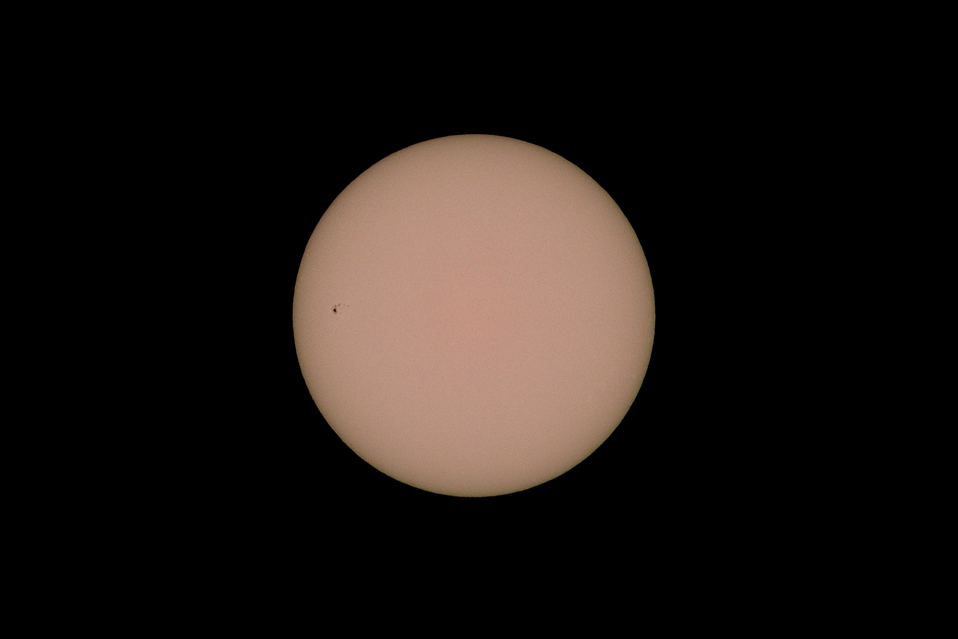
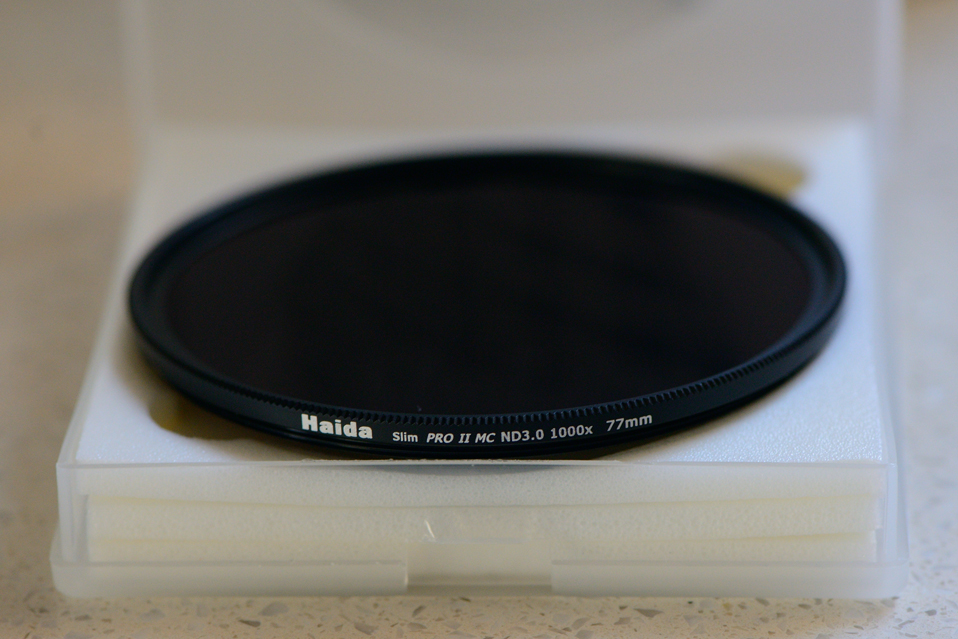
The photograph above is a standard photo of the sun on a clear day using daylight color balance. It was taken using a 400mm lens at f/11, ISO100 and 1/8000s. However, along with all these settings there was a 15 stop ND filter and a polariser attached to the front of the lens. So even using the limits of the camera/lens (1/8000s is the max shutter speed, ISO100 is the minimum ISO without entering extended ISO which would reduce dynamic range and f/11 is roughly the diffraction limit of the lens I was using, going beyond this reduces sharpness of the final image), I still needed to complement them with 16 stops of light stopping power. The 16 stops consists of a 10-stop, 1000x ND filter (also known as a big stopper - see photo on the right), a 5-stop, 32x ND filter and the polariser which causes about a 1-stop loss of ambient light.
 To put this level of light stopping
power into perspective, taking the camera settings of ISO100, f/11 and 1/8000s, the addition of 16 stops
of filtration is the equivalent of modifying the 1/8000s shutter speed to 1/524,288,000s and using this
shutter speed without filtration. I don't know of any DSLRs out there with shutter speeds in the half a
billionth of a second range! This is exactly why, at the very minimum, you will need a 1000x ND filter
and I mean this is an absolute minimum and will most likely lead to over-exposed images. Check out our
article on ND filters and their branding for a detailed
explanation of the various branding notations. There is an alternative worth mentioning and it is called Baader
Astrosolar Film and this stuff is readily available from telescope or astronomy shops. This is the stuff
used in eclipse viewing glasses, those cheap cardboard glasses handed out at eclipse events. It is a cheap
alternative to the previous option of using ND filters though it will not have the same optical qualities.
Welding goggles are another option though they will not block all wavelengths and prolonged use is not
recommended.
To put this level of light stopping
power into perspective, taking the camera settings of ISO100, f/11 and 1/8000s, the addition of 16 stops
of filtration is the equivalent of modifying the 1/8000s shutter speed to 1/524,288,000s and using this
shutter speed without filtration. I don't know of any DSLRs out there with shutter speeds in the half a
billionth of a second range! This is exactly why, at the very minimum, you will need a 1000x ND filter
and I mean this is an absolute minimum and will most likely lead to over-exposed images. Check out our
article on ND filters and their branding for a detailed
explanation of the various branding notations. There is an alternative worth mentioning and it is called Baader
Astrosolar Film and this stuff is readily available from telescope or astronomy shops. This is the stuff
used in eclipse viewing glasses, those cheap cardboard glasses handed out at eclipse events. It is a cheap
alternative to the previous option of using ND filters though it will not have the same optical qualities.
Welding goggles are another option though they will not block all wavelengths and prolonged use is not
recommended.
So now that we have defined the type of filtration you need to take photos of the sun, how do you actually go about photographing it? As shutter speeds are really high, a tripod is not completely necessary. However, if you are using a long telephoto it is probably best that you use a tripod to keep the sun in the frame without having to check each time you go to take a photograph. Using a 100mm lens for example would not require a tripod as the field of view is a lot wider, but for long reach such as 300mm and upwards I would recommend a sturdy tripod.
When framing the sun, DO NOT USE THE VIEWFINDER. This is the best piece of advice I can give anybody out there aiming to photograph the sun for the first time. It doesn't matter if you have 10 or 15 stops of ND filters on the front of the lens, it simply is not worth it. Instead, use the Liveview function on your camera. Most modern DSLRs have this. Think of it another way, you may have liked to play about with a magnifying glass when you were a kid, scorching leaves or burning ants alive! Well using the viewfinder is a toned down version of the same thing, the lens being the magnifying glass and your retina being the ant. Use Liveview.
There is also a caveat to using Liveview. Use it sparingly because the sensor is exposed when Liveview is activated and the sensor, like your eye, is very sensitive. You only want to have Liveview activated for a second or two at a time, no more, otherwise you run the risk of overloading the photosites in your sensor and this is something that really needs to be avoided as it will damage the sensor. When Liveview is not activated the mirror directs the light from the lens through the viewfinder so the camera is perfectly safe.
The easiest way, I have found, is to position the camera on the tripod and point the camera as accurately as possible in the direction of the sun. Use the shadow of the camera on a white piece of paper to determine if the camera is pointing directly at the sun. Then use the widest focal length on your telephoto lens, this will give you the widest field of view and when you activate Liveview you have the best chance of seeing the sun on the LCD. If you dont see it then you need to turn off Liveview and play around with the position of the camera. Once you have the sun visible in Liveview then it is just a case of centring the sun. Turn off Liveview, then adjust the altitude and azimuth (up/down and left/right) of the camera and use trial and error by switching on Liveview each time to ensure the sun is centred. Once centred then you can zoom in the maximum focal length of the lens. This trial and error process is actually far easier to do in reality so just give it a bit of time and avoid looking through that viewfinder.
Now you are ready! The hard work is done. The rest is easy. Use a remote shutter release if using long focal lengths, it will ensure minimal movement. Using Mirror Up mode has its own risks as this exposes the shutter and the shutter being black is likely to heat up if you dont press the shutter release again. If you are confident you will not forget to press the shutter release a second time then by all means use the Mirror Up mode. Give the camera 2 seconds for the mirror vibrations to dissipate before pressing again. Dont forget to take lots of photos especially during each stage of an eclipse if that is what you intend. This will ensure you have at least 1 sharp and focussed image per stage as images don't always work out as planned.
As a summary:
- When photographing the sun or a solar eclipse use a minimum of a 10-stop ND filter.
- When viewing the sun use eclipse glasses or Baader Solar Film. Welders goggles can also be used but are not rated as highly as Baader Solar film as they may not block out all the possible wavelengths of radiation (UV and IR) from the sun. Alternatively you can use a pinhole projector (see photo on the left). This is in fact the safest way to view an eclipse as it has zero risk.
- When photographing the sun do not use the viewfinder, use Liveview intermittently.
- Do not worry if you have your camera pointing towards the sun, once the mirror is down, i.e. Liveview not activated or Mirror Up not activated, then this will not harm your camera. The mirror covers the shutter/sensor components by default and will redirect the light through the viewfinder. As soon as the mirror lifts then you are exposing the sensitive parts of your camera.
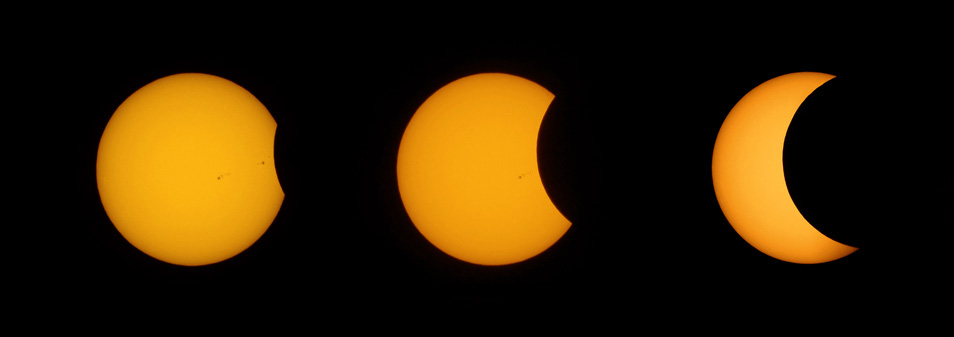
- All sun images using a DSLR, when correctly exposed will only expose for the sun. Everything else will be black, as in the above images. This will also apply when finding the sun in Liveview. The sky will be pitch black and you will only see the white disc of the sun.
- Did I mention don't use the viewfinder!

As an aside: the March 2015 eclipse is almost upon us. This will be visible in Europe, North Africa, Greenland and Russia. The path of totality is a bad one as it stretches from the north Atlantic up into the Arctic ocean, which contains very few land masses. In Málaga the eclipse will start at 08:59CET and will peak at 59% of sun coverage at 10:02. The eclipse will end at 11:10. To check the various solar and lunar eclipses for this year and future years for all world locations you can check out the Time and Date website. The link is currently configured for Malaga.
What appears to be even more interesting is the fact that 3 minutes after maximum coverage the ISS will perform a transit of the sun. Given ISS sun transits are rare events, an ISS transit of the sun during an eclipse is extremely rare and it is happening just outside Málaga!! To capture this event you will need precision equipment and precision timing as transits usually only last about a second. Given over 50% of the sun will be obscured at this time you will only have just over half a second window to catch it so a video camera attached to a telescope (with solar filter) is most likely required. If you are interested in capturing this event then you can check out the full details in the image here. This provides information for the transit details in the text part at the top of the image. The map underneath details the centre line of the transit. The corridor of the transit is just under 19kms wide so the nearer you are to the centreline the better the possibility of capturing the shot. I will be issuing an updated orbit prediction closer to the date in the event of any orbit changes between now and then.
If you enjoyed this article or others on the site and want to stay up to date with what we are doing then check out and “like” our Facebook page and you will get details of new articles posted straight to your newsfeed as soon as they are posted on our site. You can also find us on Google and Twitter. Author: Imagen Estilo
Testimonials
 Recently I had the pleasure of shooting with David and Sonia, I found them both to be very talented and professional to the nth degree. The images from our shoot are just fabulous! Lynne K
The whole family are completely blown away. The quality of the images are just amazing. Thank you so so much. C and F
Contact
![]() +34-677-695-450
+34-677-695-450
![]() +353-86-8370321
+353-86-8370321
Email: info@imagen-estilo.com
![]()
![]()
![]()
![]()
![]()
Imagen-Estilo ©
All Rights Reserved
Design by: David Cummins
Going Shopping? Check out our recommended "Resource Guide"